Tuesday, 18 February 2020

Spring is the best moment to start over


Hi everyone.
This is a layout I created using inspiration from the 13 Arts mood board challenge for February.

It is all about new beginnings ... new love, new start, new home, new you.
We all start afresh with something, sometimes more than once, at some or other point in our lives.
We always look forward to new things in our lives, never looking back ... 
only learning from it and moving on.


 Spring is always a season for new growth and I decided to create this on my layout 
based on a video which I saw on YouTube a while back of techniques to draw trees, 
branches, leaves.

The branches for this layout were created by placing droplets of ink onto a 
white sheet of cardstock and then blowing them with a straw in the direction 
that you would like them to go.


Excess ink is blown in an opposite directions to create thinner branches.


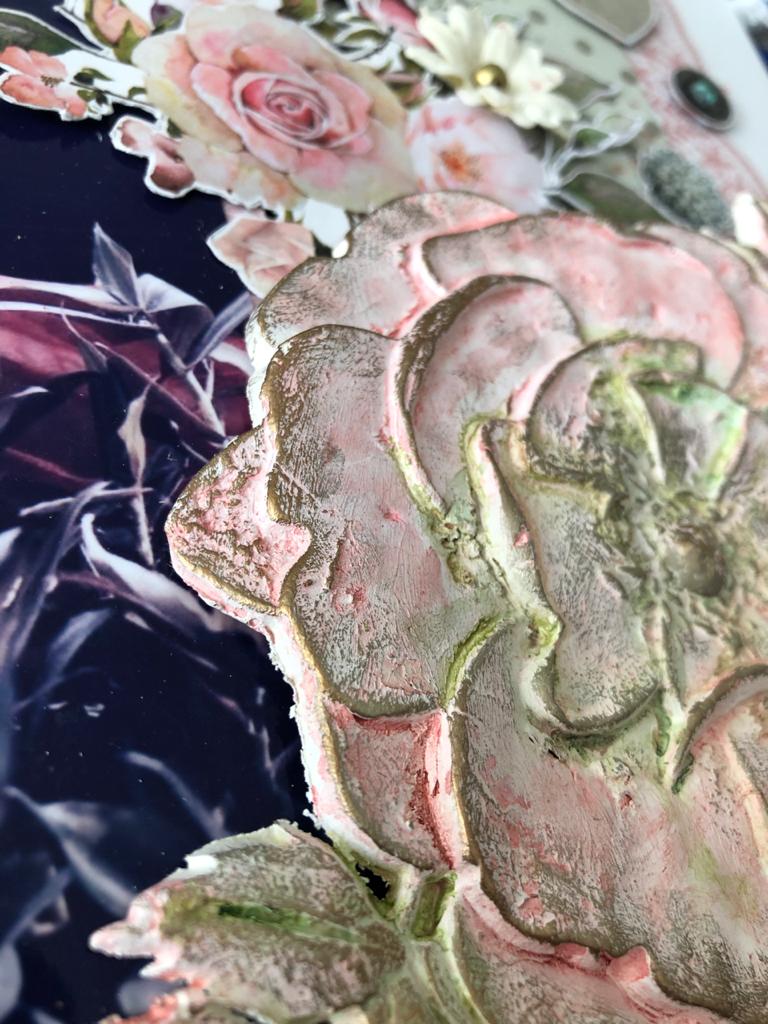
I did this with black and green ink and then splashed some diluted red paint and dark brown 
chalk mist around the branches to look like berries. 


Some stamping, flowers, berries, resin pieces as well as 13 Arts dirt and stars were added.


Finally I added a sticker title to the layout which I feel depicts what the mood board is all about.


Remember, new beginnings are a time to celebrate!

I hope that you like this layout.
Until next time!
💗


Monday, 3 February 2020

Lifetimes are made of moments just like this


Hi everyone.
I would like to share a recent single page layout, my first layout for 2020 
as Brand Ambassador for Penelope Dee using the beautiful Renaissance range, 
the first for this year.


This layout features a picture of one of my beautiful nieces having tea with 
some of her newfound friends 😉

I prepared the background of this layout by painting some stripes onto white cardstock 
using a combination of Crimson and Red Impasto paints.


The chipboard was prepared with the same combination of paints as well as some black paint.


The leftover pink and red paint was diluted with water and then splashed onto the background 
to create effect.

Leaves were stamped onto some of the patterned paper and fussy cut, together with some flowers and added to the layout.


Some of the diagonal shapes were cut out for the layout and some diamond
chipboard shapes were painted in black.


I hope that you like this layout.

Go ahead and follow Penelope Dee on Facebook or on Instagram @PenelopeDee.ZA 
to see what the Brand Ambassadors have for you this year.

Until next time!
💓


Penelope Dee Brand Ambassadors 2020


I am so excited, thrilled and honoured to be included as Brand Ambassador for Penelope Dee again this year and to be creating with their beautiful products together with this group of incredibly  talented ladies.

Look our for some brand new products coming this way soon.
💗

Friday, 17 January 2020

Life is better with you


Hi everyone.
I am sharing a recent single page layout from a class which I taught in early January
using the beautiful Rosabella range from Penelope Dee.

I prepared the page by first coating the paper with clear gesso and then stenciling onto the paper.
I then applied ink to the stenciling by first spraying with water and then adding a green 
and then a pink ink, making sure to dry between the two colours.


I added strips of paper to the left hand side and behind my photograph.


The lacy detail was added by using a thin (cake decorating) mould as well as product which, when dry, becomes rubbery and can then be removed from the mould.
Otherwise pieces of a floral lace will do.


I drew a heart as a stencil and then traced it onto two pieces of patterned paper.
These cut out and added to my layout.


I hope that you like this layout.
Until next time!
💗


Live for those who love you


Hi everyone.
Today I am sharing a recent double page layout from a class which I taught in 
early January using the beautiful Rosabella range from Penelope Dee.

The picture above really doesn't do this range
enough justice. These papers are absolutely beautiful in real life and so very easy to work with.

I used a few moulds on this layout which I used together with airdry clay.

Once the clay elements were dry, they were sprayed with water and then painted with 
pink and green inks, allowing the ink to move with the water to create 
light and dark tones on the petals of the flower as well as on the wing.
I rubbed both embellishments with gold wax, once the inks were dry, to bring out the details.


The chipboard was also painted with the inks and then randomly coated and heated 
with gold embossing powder.


Lots of flower fussy cutting and the layout was complete.


I hope that you like this layout!
Until next time!
💗


Remember


Hi everyone.
I am sharing a mini album with you from one of my recent classes which I taught
using the Blue Magnolia papers from 13Arts.

This was a very easy album showcasing the beautiful papers.
I love the blues with the black and white and I added yellow as an accent colour.

Below are some pics of a few of the pages ...


I hope that you like this mini album.
Until next time!
💙


Friday, 29 November 2019

Pawprints on my heart


Hi everyone.
Today I am sharing a single layout for FabScraps using the stunning Spilt Milk range.

For this layout I used a pic of our beautiful boy who we lost a couple of months ago.
He was my ever faithful friend and shadow and has indeed left his mark on my our heart.
We will miss him forever!

I began this layout by stenciling onto the background, around the photo, using a white paste 
and then, once it was dry, I added some diluted ink around the stenciled area, 
lightly spraying with water to allow the ink to move through the paste.


The chipboard were painted with emerald green and yellow paints and, once dry, I added some 
Glossy Accents to the wording, setting it aside to dry completely.


Some splashes of diluted paint and the layout was complete.


I hope that you like this layout.
Until next time!
🦴


Wednesday, 20 November 2019

The little things in life


Hi everyone.

I am sharing a recent single layout as Brand Ambassador for Penelope Dee
using the striking Out and About collection.

For this layout, I stenciled onto the background using a star stencil and white texture paste.


I added some stars made with clay and a Prima silicone mould and
layered the papers to frame the photograph.


 The chipboard title was painted with an orange ink and then dabbed with some glitter paste.


Some splatters of paint and some cheesecloth completed the layout.

I hope that you like it.
Until next time!
💜


Never doubt your worth


Hi everyone.

I am sharing a recent single layout for FabScraps using the ever so beautiful 
118 Antique Elegance collection.

For this layout I combined two sheets from the collection, stenciling onto the papers
with the co-ordinating script stencil.


The chipboard title as well as some die cut leaves were heat embossed in gold.


Lots of fussy cutting and flowers were added to complete the layout.


I hope that you like this layout.
Until next time!
💗


Make a wish


Hi everyone.
I am sharing a recent single layout as Brand Ambassador for Penelope Dee 
using the gorgeous Nautilus collection.

I wanted to use the navy blue paper as the background with white as the striking contrast.
I stenciled onto the background and then, once the paste was dry, 
I stamped randomly onto the paper with an embossing ink pad and then 
heat embossed the stamp image with white embossing powder.


I die cut and stamped some leaves onto white paper, cutting them 
and other leaves on the paper out to frame the photograph.


Some resin elements completed the layout.


A very simple layout, but yet so effective.

I hope that you like this layout.
Until next time!
💙