Wednesday 28 August 2019

You are loved


Hi everyone.
Today I am sharing a recent project for FabScraps - three little wooden hearts - 
using the beautiful C117 "Days gone by" collection.

I covered the hearts in paper from the collection and then stamped with a music stamp before heat embossing the stamped image with copper embossing powder.


The leaves were also heat embossed in copper.


The chipboard title, swirls and resin bird were painted in black, dry brushed 
with a turquoise paint and lightly rubbed with gold and brass wax.


The clay wings were painted in a turquoise paint and then lightly
rubbed with gold and brass wax.


Splashes of paint finished off the project.


I hope that you like this project.
Until next time!
💙


Friday 23 August 2019

Amazing


Hi everyone.
Here is a single page canvas as Brand Ambassador for Penelope Dee 
using the beautiful "Whisper" collection.

I first prepared the background by stenciling the canvas with Plaster Paste 
and then, once dry, adding a light purple ink on the left and a light blue ink on the right 
of the canvas, lightly spraying it with water to allow it to move 
through the grooves of the canvas.


The metal sheet and chipboard heart and title were painted with cool grey and 
lavender rust pastes and then lightly rubbing with a gold wax.


The chipboard title was lightly embossed with gold embossing powder.


The photograph was matted onto various papers from the Whisper collection, 
layering and raising the papers to give it a 3D effect.

I hope that you like this layout.
Until next time!
💜


Friday 16 August 2019

These boots


Hi everyone.
Today I am sharing a project which started off as a challenge and turned into a work of the heart.

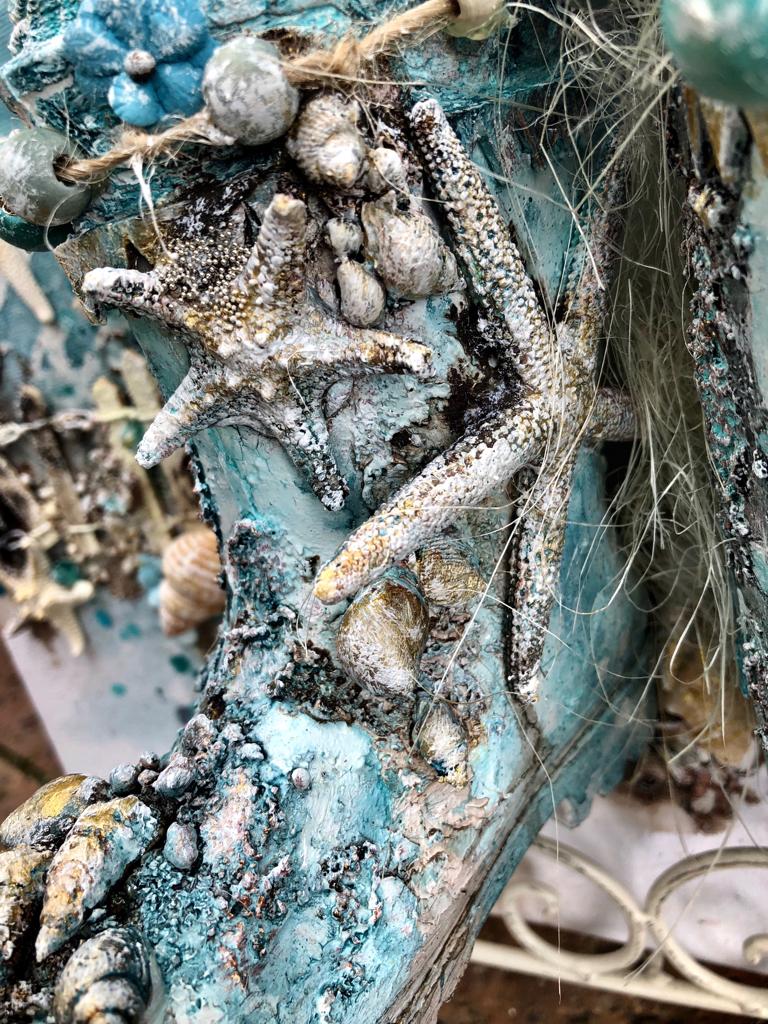
The challenge was to alter a pair of wellington boots, any which way I wanted to.
So my wellington boots turned into fishing boots.

The boots were painted with a lot of white gesso to firstly get rid of the original colour (they were purple!) and, secondly, to make it easier to use other product on the plastic that the boots are made out of.

I added some sand paste for texture and then started layering shells, stones and other embellishments which were appropriate for the ocean feel.


I mounted them onto a canvas so that they had a place to "belong" and added all elements of the beach and sea to make them look like worn boots that had been through the ocean and back.

I stenciled onto the canvas and then sprayed and painted inks and acrylic paints onto the canvas, spraying it with water and allowing the colours to "move" on the canvas.


I added a beach fence on either side of the boots, adding shells etc., painting them with gold and silver and then, once dry, dry brushing white gesso over the top of everything.


You'll be amazing what you find at the bottom of the ocean.


I threaded some wooden beads onto natural twine to give the look of the top edge of a fishing net as well as buoys in the water.


And, for my efforts, I even earned a place on the podium 😃

Thank you to Beautiful Scrapbooks for the challenge ... it was so much fun.

I hope that you like this project.
Until next time!
💙


Wednesday 14 August 2019

Life is full of beauty


Hi everyone.

I am sharing a recent altered frame as Brand Ambassador for Penelope Dee
using the beautiful Whisper collection.

I painted the frame with white gesso before stenciling and spraying it.


I added a lot of flowers and other embellishments to match the colours of the papers
as well as lots of fussy cut elements from the range.


I painted some of the elements with rust pastes to make them look old and weathered.


Life is indeed full of beauty ... just look around!


I hope that you like this project.
Until next time!
💜


Santorini


Hi everyone

Today I am sharing a canvas of the beautiful Greek islands
which was done for a friend who was gifting it to someone who comes from Greece.

The blues and whites of the papers are a perfect representation and the different elements used from the range epitomise the carefree, simple lifestyle of these beautiful islands.
It makes you want to get on a plane and go there! ✈


I used the shutters because it reminds me so much of the little windows of their homes and I can just see the women talking to and laughing with to each other through them.


Some more closeups of the details ....


I hope that you like this canvas.
Until next time!
💙


Tuesday 6 August 2019

Our Story


Hi everyone.

I am sharing some pics of a recent mini album class which I taught
using the beautiful "Bloomville" papers from Mintay.


Here is the outside of the album ...


and the inside of the album ...


plus a few of the pages ...


Beautiful papers with so many elements to cut out and embellish your album pages.

I hope that you like this mini album.
Until next time!
💛


Always and Forever


Hi everyone.
I am sharing a single layout done for the FabScraps Design Team using their 
beautiful C116 Love Story Collection.

I used a wedding photograph of my parents for this layout.
Even though they are both no longer with us, they were the perfect example of true love and, 
in my heart, will be together forever and always.

The small hearts within the large heart was done with one of my Silhouette Cameo cut files.
I then placed some of the other paper beneath it to back the hearts.


Papers were cut to matt the photograph and various elements from the range were cut out and 
used on the layout. "Our Love Story" is a sticker from the range. 


So many pretty colours and cutouts. 
The chipboard title was covered in sticky glue and then glitter applied. 


Some splashes of inks and paint and the layout was complete.

I hope that you like this layout.
Until next time!
💗


You are simply amazing


Hi everyone.

Today I am sharing a recent double page layout created as Brand Ambassador for 
Penelope Dee using the beautiful Whisper collection.  I love the lilacs, purples and greens 
in this range so it was really easy to create with it.  I will also be posting a few other projects 
with this collection in the next few weeks.

I used photographs of my dauther's 16th birthday photoshoot.  I know I'm biased but she really 
is simply amazing ... that's when she's not driving me crazy 😄

I was inspired by Prima Marketing Finnabair's use of her icing pastes together with an 
embossing folder.  All you do is apply a generous (not too thick) layer onto the embossing folder 
and leave in a warm place to dry.  This process could take a few days so plan ahead.

I tore the dried icing paste into pieces and used this on both sides of my layout.


I used the Amethyst Magic Icing Paste for this layout and used the same embossing folder to 
matt the paper which I used behind my two jumbo photographs.  The raised parts of both were 
rubbed with Peacock metallique wax.

The chipboard frame and wording were coloured with Silver and Black Iris All Purpose Inks and 
then lightly heat embossed in Silver and rubbed with some of the Peacock wax.


So many pretty cut out flowers and other elements were added to complete the layout.


I hope that you like this layout.
Until next time!
💜