Sunday, 15 July 2018

Now and Forever


This was a recent wooden canvas using a Prima wooden shutter, which I love.  They make me feel as if I'm in a garden in the South of France, peering through an old window set in an old wall of a very old building 😃

For this canvas, after I had given it a coat of gesso, I stenciled hanging leaves from the top of the canvas using Finnabair White Crackle Texture Paste.  I also stenciled some bricks onto the areas around where my shutters and embellishments would go using Finnabair Paper Texture Paste.

Once the pastes were dry, I added some ink sprays in greens and browns, allowing it to dry before adding some stamping with a script/word stamp randomly onto the canvas.

Using a script stencil and gold Nuvo Mousse, I added some script to the canvas.


I altered the wooden shutters using Finnabair Rust Pastes using the brown, mint and gold rust paste.  I first covered it in brown, then added a bit of the mint and gold pastes as and where I wanted it to be and then went over it all again with a bit of the brown paste.


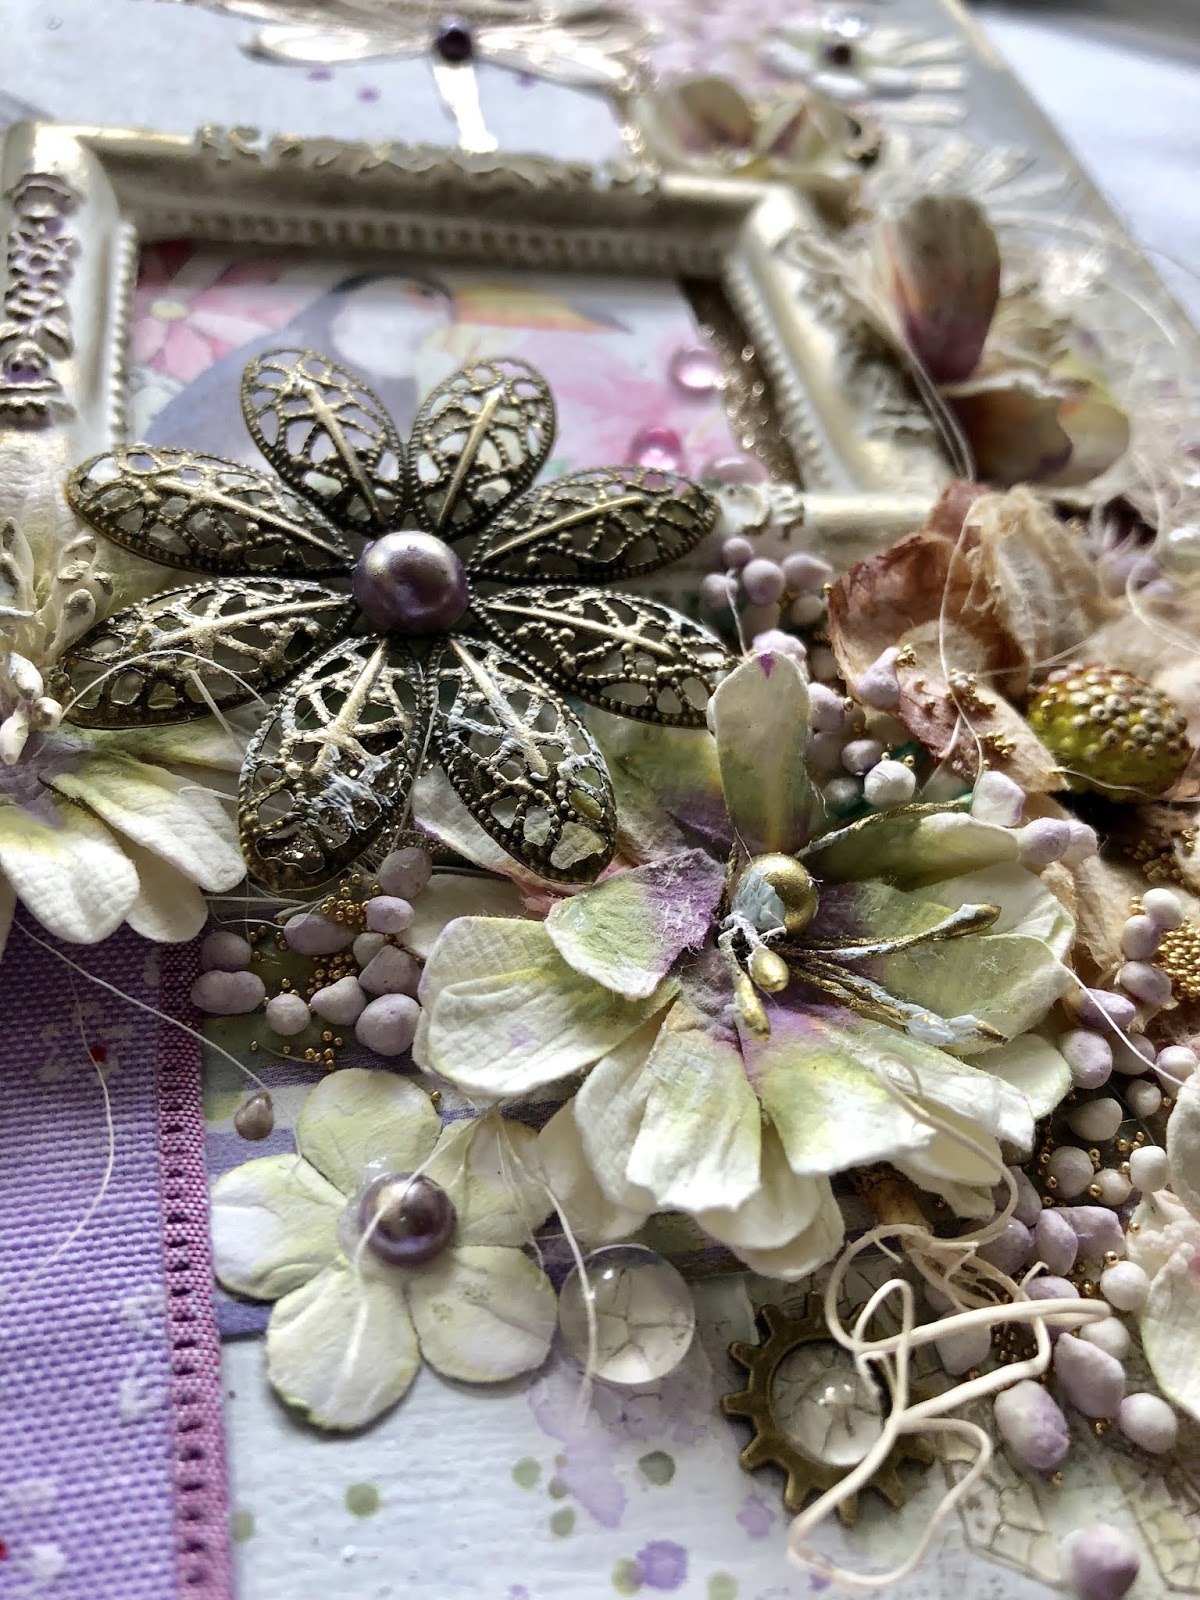
I love the new (and old) Prima moulds and here I used the "Rustic Fleur 1" mould to make some leaves as well as flowers.  I covered these in yellow paint before adding them, other flowers and embellishments to the canvas.


I added a bit of the rust paste to the key and lightly sprayed it with water, allowing the brown paste to run down the paper behind the key.


The moss and flowers add a perfect touch to this old wall look.

Once I had added everything to the canvas, I lightly painted over most things with white gesso and then, once that was dry, I rubbed Prima Metallique Wax in Aged Brass over the crackle texture paste leaves, the shutters and anything else on the canvas that I felt need some dimension.

I love the finished look!  And I really hope that you do too 💛


Friday, 13 July 2018

Let the beauty of this world shine through


This is a mini album and box which I created using the new FabScraps C108 "Pink Lemonade" collection.

Oh my! 😍 What a beautiful range!!  I just love the palm leaves, birds, stripes and flowers ... and I have a newfound love for flamingos!

I used an old box that I had and painted the outside before adding papers and embellishments.  I also stenciled some leaves under and on top of the striped paper using the stencil which goes with this range and some Finnabair White Crackle Texture Paste.


I added white gesso to some of the flowers and metal embellishments to "soften" their look.


I added some Finnabair's Art Alchemy Metallique Wax in Aged Brass over the resin frame, some of the flowers as well as around the edges of the box.


The box opens up to reveal a mini album.


The album consists of pockets and flaps and, using the stamps from the range, I stamped onto velum and heat embossed the images with gold embossing powder.


I hope you like this project!

COMPETITION!


FabScraps are running a competition on their Facebook page until 20 July 
where you can go and like your favourite project, tag a friend and stand a chance
of winning one of their new ranges.
https://www.facebook.com/lovefromfabscraps/

💙💚💛💜


Everyday is Beautiful


It has been such an honour to be included on the FabScraps Design Team this year and such a pleasure to work with their beautiful papers ... and the two new ranges are amazing!

This layout was created with their C109 "A Moment in Time" collection and the papers are indeed dreamy ... perfect for wedding or engagement photo's or to just celebrate being in love.

I don't usually scrapbook with photo's of myself, but these pic's matched the papers perfectly so I just used two of them.

I bought some of the Nuvo copper Gilding Flakes a while back and this layout was a great way to try the product out.  And I love how it looks!


Just add some beautiful flowers, lace and gems to a layout and it is complete.


If you would like to view the tutorial on how I created this project, please pop on over to the FabScraps blog at http://fabscraps.com/blog/  for full notes on how to put the layout together from start to finish.

Until next time!💗


Sunday, 13 May 2018

A tribute to my mom


When I think about my mom, I think of three things ... she was beautiful, she was a strong woman and she was brave.

She grew up as an only child, sometimes suffering the loneliness that goes along with it, especially having a father who was away from the home a lot of the time.  But despite that, she grew up to be a loving, caring wife, often putting others' needs before her own and working full-time employment until late in life in order to help the family make ends meet.

All that I am I owe to my mom.  We didn't have a bad relationship, but we weren't as close as I believe a mother/daughter relationship should be.  I think that the key is to not repeat the patterns of the past and, when I eventually had a daughter of my own, I vowed that she would never feel that same longing after I am gone.

I still find myself doing things just as my mom taught me, for instance, preparing a meal the way she would do and, when teaching my daughter about certain life skills, I often find myself saying "you do it like this, because that's how my mom taught me".  We, as daughters, often say that we never want to grow up like our moms, and yet, as the saying goes "whenever I open my mouth, my mother comes out".  That's really funny, but so true! I guess, not all of those memories can be great ones, but despite everything, I know that my mother loved us with everything that she had within her ... her family was her life and she moved from this earth to eternity knowing that her family respected, honoured and loved her.

She is clothed with strength and dignity, and she laughs without fear of the future.
When she speaks, her words are wise, and she gives instructions with kindness.
She carefully watches everything in her household and suffers nothing from laziness.
Her children stand and bless her.
Her husband praises her:
"There are many virtuous and capable women in the world, but you surpass them all!"
Charm is deceptive, and beauty does not last;
but a woman who fears the Lord will be greatly praised.
(Proverbs 31:25-30)


I absolutely LOVE this picture of my mom, taken (I think) when she was in her early 20's.  To me she looks like a Hollywood movie star of that era and happiness is evident in her smile.

When I recently saw this Dina Wakeley stencil, I knew that I had to have it because, to me, it reminded me so much of my mom.

I used Finnabair Paper Texture Paste with it which created a rough texture on the page.  Once it was dry, I edged it with Tim Holtz Distress crayon, blending it with some water.  I rubbed some of the Finnabair Metallique wax onto the paste at the end.


The resins used on the page were sprayed with inks, left to dry and then wax rubbed onto them.  I love how the waxes bring out the tiny details that you might otherwise miss.


The chipboard words were coloured in pink Tsukineko All Purpose Ink and then randomly heat embossed with gold and rose gold embossing powder.


Lots of pretty flowers and embellishments, of course!


I love you mom ... always have and always will.
Until we see each other again 💙

If your mom is still on this earth, give her a call today
and tell her that you love her!


Friday, 27 April 2018

Happiness


I have been finding some time for myself lately, being creative in my own space, allowing myself to experiment and find my own style.  There is so much going on in the creative world - with new projects and products almost every day - that it is sometimes easy to copy, or find things that we like in someone else's style and thereby lose ourselves in the process.  So this year, I aim to do just that - figure out who I am in this crazy scrapbooking and mixed media world.  There is always so much pressure to produce projects and work that others will like, but I rather want what I do to bring joy to my own heart first and foremost.

Having said that, here is a round wooden canvas that I did with a picture of my daughter, taken before her matric dance.  I love this photo - such a classic beauty and such a timeless photograph.

For this project, I used beautiful Prima "Vintage Floral" papers and some other flowers and embellishments from one of their latest ranges as well as added some of my favourite Tim Holtz Distress Oxides, which I absolutely love!


Here you will see that I used Finnabair "Platinum Crackle" Texture Paste through a stencil, on top of some of the Distress Oxides.  When the crackle paste was dry, I rubbed some of Finnabair's gold Metallique wax onto the texture paste to accentuate the cracks.


The title as well as some hexagons were heat embossed with some gold embossing powder. The doily and leaves on the project were stamped onto velum paper and heat embossed with white embossing powder.


Something else that I love ... micro beads.  They just finish off a project and I love how they look.


This is a clay flower which I found at a craft shop a while ago.  I coloured the petals with some of the Distress Oxides, added some micro beads and secured an acetate word embellishment in the centre.


This frame is an old metal frame which once held a mirror and has been lying in my bedroom for ages, just waiting for me to find a use for it.  And here it is.  It was dark silver in colour but I painted it with some dark grey gesso (white gesso with black paint) and then rubbed gold Metallique waxes over it to give it that antique gold look.  So glad that I could finally use it and it looks beautiful!

I hope you like this project.

If you love scrapbooking and mixed media, you are welcome to follow my LivingLife page on Facebook as well as my profile on Instagram.

Until next time!


Friday, 13 April 2018

Happy Life


Here is some FabScraps inspiration of a recent canvas which I did using their new C105 Memory Lane collection.

This is a picture taken of my daughter and two of the girls in her dance group during the days when she still did ballet.


I love the colours of this range ... perfect for some pretty flowers, leaves and other gorgeous embellishments.


For this project you will need:


FabScraps Memory Lane Collection paper range C105:  007 & 008
FabScraps DC105 008 Die Cut Word
FabScraps Stencil DS090
FabScraps ST105 002 Stickers
Wooden canvas 30 x 30cm
Gel medium
Gesso
Prima Color Bloom spray (Sunshine, Ginger Coral)
Prima Mini Art Stones
Prima Melange
Prima Finnabair Art Alchemy Acrylic Paint (Opal Magic – Rose gold)
Prima Finnabair Art Alchemy Metallique Wax (Aged Brass)
Gold embossing powder and embossing ink pad
Chipboard:  Decorate heart, letters
Flowers, leaves, pearls, twine, white gauze, white mesh, cream sisal fibres, gold micro beads, loose beads, string of beads, metal butterfly, word sticker


Thursday, 29 March 2018

Plant your Dreams

It has been such an honour for me to be included on the FabScraps Design Team for 2018/2019 and I have been enjoying creating for the team for the very first time.  Thank you to FabScraps for having confidence in me and I look forward to a fun, creative year with the company.

Below is my first project for the team ... a mini album using the C105 Memory Lane collection.


For this project you will need:

➤FabScraps Memory Lane Collection paper range C105:  005 & 006
➤FabScraps DC105 001 Die Cut Album
➤FabScraps DC105 007 Die Cut Word
➤FabScraps Stencil DS090
➤FabScraps ST105 002 Stickers
➤Tim Holtz Distress Ink (Vintage Photo)
➤Prima Color Bloom spray (Sunshine, Peony)
➤Nuvo Mousse (Fresh Copper)
➤Tsukineko Delicata ink (Celestial Copper)
➤Ranger Liquid Pearls (Copper Pearl)
➤Treasure Copper Wax Gilt (Copper)
➤Copper Embossing Powder and Embossing Ink Pad
➤Texture paste
➤Water colour paints
➤Stamp:  Chicken wire
➤Flowers, leaves, pearls, ribbon, lace, twine, gauze, resin flower pot

Instructions:

➤Using the Die Cut Album, trace around the edges of the watering can onto the 005 and 006 papers and cut out until you have enough to cover the chipboard pages as desired.  Only cover the back of the first and last pages. Glue these down.  Note:  Remember to make the holes in the handle as you glue each piece of paper.
➤Raise the sticker “I smile when a new day begins” onto some paper and cut a border around the edge.  Raise the sticker and secure it in the centre of the back of your cover page.
➤On one page (that you haven’t covered with paper), using texture paste and your stencil, add some bird feet onto the top left of the page.  Once everything is dry, add some of the Sunshine spray over the bird feet and allow the ink to run down the page.  Using watercolour paints, paint some branches and leaves and then, when dry, add some leaves as well as a bird and some small flowers cut from your paper.
➤On another uncovered page, stencil leaves in copper Nuvo Mousse and leave to dry.  Add some of the two inks to your page, allowing the inks to run down the page and through the leaves.  Leave to dry.  Cut two circles in different sizes and raise these in the centre of the page, adding some lace around the edge of the bigger circle.  Add the sticker “you are my home” onto the smaller circle.
➤On the last uncovered page, using the stencil and texture paste, stencil the window into the centre of the page.  When dry, lightly paint some brown watercolour paint around the window panes.  Spray the gauze with some of the ink sprays and leave to dry.  Cut paper to cover the top of the window as well as curtains for either side of the window.  Cut the gauze to fit behind the curtains and secure all of these to the page.  Cut flowers as a “window box”.
➤Distress around the edges of the front and back of each page with the Vintage Photo Distress Ink.
➤Using your stamp and copper ink, add some stamping to each page.
➤Press the FabScraps DC105 007 Die Cut title into the Embossing Ink Pad.  Dust the words with copper embossing powder and heat through until all the powder has melted.
➤Arrange all embellishments as per the picture to complete the album.
➤Thread some ribbon through the holes in the handle and tie loosely so that it is still easy to turn the pages.
➤Lightly splash some green watercolour paint onto your pages and allow to dry.
➤Add some liquid pearls to the album as you desire and leave to dry.

Your album is now complete!


Wednesday, 28 March 2018

A moment lasts forever


I loved these Kaisercraft papers when I saw them.  I love the colours and the designs, especially the beautiful roses on the papers ... very different to their previous ranges.  In fact, I liked them so much that I bought them all!

This is the first project that I did - a canvas with a pic of my daughter twirling around in the garden. Once upon a time, she used to do ballet and I loved to watch her dance.  But who needs an excuse to put on a tutu and dance around the garden, right?! ;-)  We still laugh when we see these pics because a moment, no matter how silly it might seem, is always remembered and really does last a lifetime.The title has been inked in a navy ink, lightly embossed with Ranger "Rose Gold" embossing powder and then lightly dusted with some white gesso to soften the look.


I love micro beads! and add them to just above every project.


Resin embellishments seem to be very popular at the moment.  This was a beautiful frame which I bought locally.  I sprayed it with some inks, painted it with a bit of white gesso and then used a Finnabair rose gold wax over the edges to make the detail stand out.  Love how it turned out!


I also did some stamping on the two opposite corners with a lace stamp and then heat embossed it with the rose gold embossing powder.


Our little kitty, who has just turned one, always comes to see what I'm doing when I take pics of my projects.  I'm sure he approves and loves this range too! ;-D

.  

Products used in this project:  Kaisercraft "Misty Mountains" papers, Ranger "Rose Gold" embossing powder, Ranger "Faded Jeans" and "Seedless Preserves" Distress Spray Stains, Finnabair "Rose Gold" Metallique wax, clear and white gesso, texture paste, resin frame, flowers, Finnabair art stones, gold micro beads, some Prima "Lavender" embellishments.